Hans Mast

travel photography guides

  • Blog
  • Portfolio
  • Gear
  • About
Goðafoss Waterfall, Northern Iceland. March 2, 2016.

Goðafoss Waterfall, Northern Iceland. March 2, 2016.

Goðafoss :: Northern Iceland

Goðafoss
February 10, 2017 by Hans Mast

While there are many gorgeous waterfalls in Iceland, I think Goðafoss was my favorite. I think a lot of the reason for this was how gorgeous it was in the winter. The waterfalls in southern Iceland were beautiful, but a bit muddy around the edges as we were right on the edge of winter/spring and the temperatures were right at edge of freezing/melting. Northern Iceland was much colder, giving us this gorgeous ice and snow. (The downside of the lower temperatures was that while flying my DJI Phantom 3 Pro drone around Goðafoss, my fingers nearly froze off as my gloves were too thick to operate the remote, so I took them off. Not having thin gloves was a big mistake that I'll be sure to rectify on my next trip.)

For this shot, I used a tripod and a neutral density filter (in a holder). This blocks out much of the light, which allows a long-exposure photograph even in the bright middle of the day. This blurs the water beautifully, showing the motion of the water in a still photograph.

February 10, 2017 /Hans Mast
iceland, neutral density filter, long exposure, waterfall, Goðafoss, a7rII, winter, snow, ice, akureyri
Comment
Sunset over Palazzo Versace on the Gold Coast. Taken with DJI Phantom 3 Pro.

Sunset over Palazzo Versace on the Gold Coast. Taken with DJI Phantom 3 Pro.

Sunset at Gold Coast, Queensland, Australia

sheraton gold coast
September 06, 2016 by Hans Mast

We spent one awesome night at the Gold Coast. The sunset was absolutely incredible. And I stupidly missed its peak by not getting out there early enough. Always get to sunsets and sunrises early and watch them unfold. Don't wait until you see they're nice before going, or you'll be late. Learn to recognize the clouds and future paths of light that will make for a great sunset or sunrise.

Sunset over the main Gold Coast strip shortly *after* sunset had peaked. All the clouds on the left had been brilliant pink and orange mere seconds before. Taken with DJI Phantom 3 Pro.

Sunset over the main Gold Coast strip shortly *after* sunset had peaked. All the clouds on the left had been brilliant pink and orange mere seconds before. Taken with DJI Phantom 3 Pro.

We stayed at the fantastic Sheraton Grand Mirage Resort Gold Coast! I paid 12,000 Starwood points for one night. As a Plat75/Lifetime Gold member, they upgraded us to a ginormous 1000 square foot one-bedroom suite! It was an incredible deal as a Platinum member. If we hadn't had a super-early flight out of Brisbane the next morning, we could have also enjoyed free breakfast as a Platinum member, which I'm sure would have been great. I wish I'd've taken the time to photograph some of the beautiful grounds, including gorgeous pools. Ah well, there's always next time. All in all, the Sheraton Grand Gold Coast for SPG Platinums is a fantastic value on either points or cash. Highly recommended.

Sunset over the Sheraton Grand Gold Coast. Taken with DJI Phantom 3 Pro.

Sunset over the Sheraton Grand Gold Coast. Taken with DJI Phantom 3 Pro.

Long exposure photo taken by Fineas of me flying the DJI Phantom 3 while concentrating carefully on photographing the sunset. I was concentrating so closely, I didn't realize he was still taking a photo and I moved halfway through the exposure. But …

Long exposure photo taken by Fineas of me flying the DJI Phantom 3 while concentrating carefully on photographing the sunset. I was concentrating so closely, I didn't realize he was still taking a photo and I moved halfway through the exposure. But I kinda like the effect!

Shot taken down the Gold Coast island, away from the strip. Taken with DJI Phantom 3 Pro.

Shot taken down the Gold Coast island, away from the strip. Taken with DJI Phantom 3 Pro.

Sunset walk on the beach

Sunset walk on the beach

Another happy accident photo. This was on my second flight of the evening. My first battery was nearly empty, so I dove for the beach, landed, swapped batteries, and took off again as fast as I could. I failed to notice that when I landed, my camera…

Another happy accident photo. This was on my second flight of the evening. My first battery was nearly empty, so I dove for the beach, landed, swapped batteries, and took off again as fast as I could. I failed to notice that when I landed, my camera had buried its lens in the sand, coating it with sand. When I took off again and took some pictures, the red landing lights of the Phantom reflected off the grains of sand, creating a dreamy bokeh lights effect over the whole photo. Or the photo has chicken pox, depending on whether you're a pessimist or optimist. :-)

September 06, 2016 /Hans Mast
gold coast, australia, dji phantom 3, aerial photography, sunset, hdr, a7rII
Comment
Vintage planes at Lethbridge Airport

Vintage planes at Lethbridge Airport

Lethbridge Airport and the Antonov AN-2 :: Victoria, Australia

Lethbridge Airport
September 05, 2016 by Hans Mast

The plan was to have Fineas fly the two of us along the Great Ocean Road in a plane. Unfortunately, the weather didn't cooperate. Fineas is only rated for visual flight rules (VFR) and couldn't fly through the very low ceiling of clouds to reach the coast, which was perfectly clear.

Fineas taxiing the plane after some touch and go landings to familiarize himself with the plane and airport

Fineas taxiing the plane after some touch and go landings to familiarize himself with the plane and airport

So we spent the day at Lethbridge Airport keeping an anxious eye on the sky. We did have a lovely time chatting with a flight instructor and student for much of the day. As an AvGeek, I really did enjoy the day, despite its disappointment.

Vintage bi-plane Lethbridge Airport

Vintage bi-plane Lethbridge Airport

As a bonus, the hangar next door was filled with several beautifully maintained and still quite flyable vintage aircraft, the highlight of which was this Soviet-made Antonov AN-2, the largest bi-plane in the world, I believe:

Antonov AN-2 with very stylish leather couches

Antonov AN-2 with very stylish leather couches

Antonov AN-2

Antonov AN-2

September 05, 2016 /Hans Mast
antonov, lethbridge, lethbridge airport, great ocean road, victoria, australia, a7rII, avgeek, an-2
Comment
Fineas, always stylish and striking a "man pose"

Fineas, always stylish and striking a "man pose"

Great Ocean Road :: Victoria, Australia

Great Ocean Road
September 04, 2016 by Hans Mast

The Twelve Apostles were breathtaking. The rest of the Great Ocean Road? Uninspiring. Before I go any further, I need to insert some caveats to quell the howls of protest from the many staunch lovers of the GOR.

First off, we did the GOR in a ridiculously short amount of time. This travel blogger took two weeks to explore GOR, while we did the whole thing in under 24 hours, something every writer I read begged us not to do.

Second, as the driver I didn't get to see as much, as this blogger talks about.

Third, I was driving this:

Audi A4 for which I used Hertz points; photo by Fineas

Audi A4 for which I used Hertz points; photo by Fineas

Which meant that driving was often more fun than looking at the scenery. Looking at the scenery was downright inadvisable at times, as I enjoyed the fun curves and high speed limits of the GOR. Don't get your self-righteous scold face on: the Audi A4 had excellent handling and stuck to my lane very nicely around the curves; I never made any dangerous, blind-corner departures from my lane.

Fourth and most importantly, the short amount of time meant we skipped three things I wish we could have visited: Loch Ard, London Bridge, and The Arch. Reviewing other people's pictures of those places again tonight make me really wish we could have spent the next day doing that instead of sitting at the airport, as you'll see in tomorrow's post.

Victorian Sheep

Victorian Sheep

Tellingly my favorite photos of "the Great Ocean Road" (besides 12 Apostles) were not actually on the Great Ocean Road, they were when we cut across the countryside on our way to Lethbridge Airport, when we found some nice sheep and an amazing tree tunnel:

Tree tunnel that reminds me of the Dark Hedges in Northern Ireland

Tree tunnel that reminds me of the Dark Hedges in Northern Ireland

Lamb trying to nurse

Lamb trying to nurse

The lamb above made a short-lived attempt to nurse, but its mum was having none of it as she preferred to glare warily at the strangers intruding at the edge of her pasture. Sheep are very easily frightened creatures. I've noted in frustration that 90% of the time I try to photograph sheep, all I get are photos of sheep posteriors as they quickly trot away from me.

Curious lamb and sheep

Curious lamb and sheep

While these sheep initially trotted away, when they had reached a seemingly safe distance, their curiosity overcame their fear and they turned to watch us.

Bottom line on the Great Ocean Road IMO: it is a beautiful, fun stretch of highway on the way to the Twelve Apostles. Definitely take the extra time to take the coast route. Take more time than we did, make sure you know every spot you want to hit and meticulously plan to hit them. But I bet you'll cut across the peninsula on the way back to Melbourne.

September 04, 2016 /Hans Mast
australia, victoria, great ocean road, sheep, audi, a7rII
2 Comments
Twelve Apostles Sunset

Twelve Apostles Sunset

Twelve Apostles, Great Ocean Road :: Victoria, Australia

Twelve Apostles - Visitor Facility
September 03, 2016 by Hans Mast

The Great Ocean Road's Twelve Apostles needs no introduction. My buddy Fineas (an Australian, pilot, and photographer) and I visited a week or two ago. We were blessed with a terrific sunset. In contrast, the sunrise wasn't much to write home about; but that's likely structural, given the way the Twelve Apostles are oriented--the sunrise was at about 4-5 o'clock over my right shoulder. It was cloudy enough, I don't know for sure, however.

Twelve Apostles Sunrise

Twelve Apostles Sunrise

Did you know that there are only eight apostles left? (The other four were "tossed to and fro, and carried about with every wind of doctrine" and collapsed.) Wikipedia writes: "The Twelve Apostles is a collection of limestone stacks off the shore of the Port Campbell National Park, by the Great Ocean Road in Victoria, Australia. Their proximity to one another has made the site a popular tourist attraction. Currently there are eight apostles left, the ninth one of the stacks collapsed dramatically in July 2005."

Twelve Apostles Sunset

Twelve Apostles Sunset

If you walk further down the boardwalk, you can get a view of more of the apostles, but in my opinion, this is the best composition there is.

Fineas photographing Twelve Apostles sunset

Fineas photographing Twelve Apostles sunset

September 03, 2016 /Hans Mast
australia, victoria, great ocean road, sunset, sunrise, a7rII
2 Comments
Arlington Row, Bibury, Cotswolds AONB, England, UK. Sony A7rII, Sony/Zeiss 55mm f/1.8 at f/8, three bracketed exposures 0, -2, +2. Edited using Lightroom, Aurora HDR Pro, MacPhun Intensify, and Photoshop.

Arlington Row, Bibury, Cotswolds AONB, England, UK. Sony A7rII, Sony/Zeiss 55mm f/1.8 at f/8, three bracketed exposures 0, -2, +2. Edited using Lightroom, Aurora HDR Pro, MacPhun Intensify, and Photoshop.

Cotswolds :: Bibury, England, UK :: How to Visit and Photograph Arlington Row

August 05, 2016 by Hans Mast

While I did tens of hours of research for our British Isles trip, it was a last-minute, night-before suggestion from dad that was one of my favorite stops of the trip: The Cotswolds. It had been a favorite of his on a previous trip to England when he was a youngster, a trip I had not been aware he had taken! I thought I knew most of the places he has traveled over the years, but this one was a surprise to me.

Arlington Row, Bibury, Cotswolds AONB, England, UK. Sony A7rII, Sony 24-70mm f/4 at 34mm, ISO 250, f/8, 1/125th. Edited in Lightroom and Photoshop.

Arlington Row, Bibury, Cotswolds AONB, England, UK. Sony A7rII, Sony 24-70mm f/4 at 34mm, ISO 250, f/8, 1/125th. Edited in Lightroom and Photoshop.

Rosemary Cottage (see the sign?), Arlington Row, Bibury, Cotswolds AONB, England, UK. Sony A7rII, Sony 16-35mm f/4 at 16mm, ISO 100, f/8, 1/320th. Edited in Lightroom and Photoshop.

Rosemary Cottage (see the sign?), Arlington Row, Bibury, Cotswolds AONB, England, UK. Sony A7rII, Sony 16-35mm f/4 at 16mm, ISO 100, f/8, 1/320th. Edited in Lightroom and Photoshop.

The Cotswolds are designated an AONB, which stands for Area of Outstanding Natural Beauty. It's a British thing that practically is a National Park-lite.

Dad researched three towns: Bibury, Bourton-on-the-Water, and Stow-on-the-Wold. We settled on visiting Bibury because it was the least complicated name. Actually, we chose it because it looked the nicest to me in some Google Image searches and it was handily right on our route from Oxford to Brecon Beacons National Park.

Arlington Row, Bibury, Cotswolds AONB, England, UK. Sony A7rII, Sony 24-70mm f/4 at 38mm, ISO 400, f/8, 1/125th. Edited in Lightroom and Photoshop.

Arlington Row, Bibury, Cotswolds AONB, England, UK. Sony A7rII, Sony 24-70mm f/4 at 38mm, ISO 400, f/8, 1/125th. Edited in Lightroom and Photoshop.

Arlington Row, Bibury, Cotswolds AONB, England, UK. Sony A7rII, Sony 24-70mm f/4 at 34mm, ISO 200, f/8, 1/250th. Edited in Lightroom and Photoshop.

Arlington Row, Bibury, Cotswolds AONB, England, UK. Sony A7rII, Sony 24-70mm f/4 at 34mm, ISO 200, f/8, 1/250th. Edited in Lightroom and Photoshop.

The most scenic part of the town is Arlington Row, pictured in all the previous images. There's a road that goes all the way to Arlington Row, but I strongly recommend against taking it. We briefly debated taking it, before being dissuaded by a sign that said "Unsuitable for HGVs". We had no idea what an HGV was (it's a "heavy goods vehicle"), but it sounded as if it might be of similar size to our nine passenger Vauxhall Vivaro van. The road you shouldn't take is appropriately named Awkward Hill Rd. and is incredibly narrow and steep and there's no place to park: you'll likely annoy local residents by blocking their driveways or the entire road itself if you try to park back there. Instead, there's a very nice car park with a 60 second walk across a pedestrian-only bridge. I've placed two red arrows at the beginning and end of the parallel car park very close to "Arlington row entrance" which is where the pedestrian bridge is. I've placed a third arrow at another free car park that adds only an additional 60 seconds of walking.

On a future trip, I'd love to explore The Cotswolds more, visiting a few of the other towns we learned about. Even though this is an AONB, there are other places in the British Isles with far more natural beauty. The really killer feature of The Cotswolds for me was not driving through the countryside, but rather the unique stone cottages in the quaint towns. The Cotswold stone used is mined locally and has some measure of renown.

Between the two parking lots I marked on the map. Bibury, Cotswolds AONB, England, UK. Sony A7rII, Sony/Zeiss 55mm f/1.8 at ISO 320, f/8, 1/125th. Edited in Lightroom, Photoshop, MacPhun Intensify.

Between the two parking lots I marked on the map. Bibury, Cotswolds AONB, England, UK. Sony A7rII, Sony/Zeiss 55mm f/1.8 at ISO 320, f/8, 1/125th. Edited in Lightroom, Photoshop, MacPhun Intensify.

Bibury, Cotswolds AONB, England, UK. Sony A7rII, Sony 16-35mm f/4 at 16mm, ISO 100, f/8, 1/1600th. Edited in Lightroom.

Bibury, Cotswolds AONB, England, UK. Sony A7rII, Sony 16-35mm f/4 at 16mm, ISO 100, f/8, 1/1600th. Edited in Lightroom.

We finished our hour-long stop in Bibury by eating some delicious home-made ice cream and sipping some high quality espressos from Bibury Trout Farm, located across the road from the second car park I mentioned above. It was a perfect end to our quick visit to a wonderful little English village!

Home-made ice cream and espressos at Bibury Trout Farm

This post is part of a series of posts about my family's British Isles trip in July/August of 2016. My parents and four siblings joined me as we went from London to Dublin and everywhere in between in 2.5 weeks. Here's our itinerary:

  1. London (England)
  2. Stonehenge (England)
  3. Oxford (England)
  4. Bibury, Cotswolds (England)
  5. Wales
  6. Peak District (England)
  7. Chatsworth House (Peak District, England)
  8. Yorkshire and Staithes (England)
  9. Foggy Scottish Highlands (Scotland)
  10. Bright Scottish Highlands (Scotland)
  11. Kilts & Bagpipes (Scotland)
  12. Edinburgh (Scotland)
  13. Northern Ireland
  14. Waterford/Dunmore East (Ireland)
  15. Western Ireland and the Cliffs of Moher (Ireland)
  16. Dublin (Ireland)
August 05, 2016 /Hans Mast
british isles, uk, england, cotswolds, a7rII, sonyalpha, village, europe
Comment
Aurora Borealis near Akureyri, Iceland. March 2, 2016. Sony A7rII with Rokinon 14mm f/2.8, ISO 3200, 8s.

Aurora Borealis near Akureyri, Iceland. March 2, 2016. Sony A7rII with Rokinon 14mm f/2.8, ISO 3200, 8s.

How to Photograph Northern Lights :: Akureyri, Iceland

July 31, 2016 by Hans Mast

I traveled to the far north of Norway in January of 2016 hoping to see and photograph the Northern Lights. I saw them faintly on the drive from the airport to my first Airbnb for the night, but by the time I arrived, they had retired for the night. Furthermore, British Airways was holding my tripod hostage at London Heathrow, so I would have had to jury rig something with uncertain results. Despite spending nearly a week in the Lofoten area of Norway, I never once caught another glimpse of Aurora. All that to say, when I traveled to Iceland in March of 2016, I was very eager to actually see and photograph the Aurora Borealis. On landing in Iceland, we were greeted with heavy cloud cover. This low ceiling persisted for most of our trip. One night clouds got a bit patchier and the forecast for Aurora was medium, so we went out and drove around away from the lights for a while. The Aurora was out faintly between the clouds, but barely visible to the human eye. Only very long exposures could pick up its faint hints amid the clouds. This was not at all what I had been hoping for:

Disappointing Aurora Borealis near Skaftafell, Iceland. February 29, 2016. Sony A7rII with Rokinon 14mm f/2.8, ISO 800, 30s.

Disappointing Aurora Borealis near Skaftafell, Iceland. February 29, 2016. Sony A7rII with Rokinon 14mm f/2.8, ISO 800, 30s.

The night we ended up with a terrific view of the Northern Lights was one in which I was particularly tired. We had spent a long day on the road, done some hiking through deep snow, some dicey crawling down icy rocks into a hot springs cave (while trying to balance camera and tripod), and I had bumped my head multiple times on the cave roof. I had already left my comfy Airbnb once that evening to photograph a rather lackluster sunset over Akureyri. If it hadn't been for my travel companion Curt Good's urging, I might have stayed home, despite for the forecast for clearing clouds and "Medium" Aurora activity.

We first headed straight south of town as it was the quickest route away from civilization and light pollution. What we did not yet realize is that there is a band in which the northern lights generally appear, a band which is north of most places the Aurora is viewed from. (The exception is Svalbard which is north of the band, thus the Aurora generally appears in the south from Svalbard.) This meant that Akureyri was between us and the northern lights. When they began to peek out, we quickly realized our mistake with the glow of Akureyri interfering with our viewing:

The Northern Lights just starting to peek out, dulled a bit by the glow of Akureyri. March 2, 2016. A7rII with Rokinon 14mm f/2.8, ISO 3200, 30s.

The Northern Lights just starting to peek out, dulled a bit by the glow of Akureyri. March 2, 2016. A7rII with Rokinon 14mm f/2.8, ISO 3200, 30s.

If we shot west, we could nab just the corner of the Aurora with no light pollution and an incredibly dense field of stars visible:

Shooting west from south of Akureyri. March 2, 2016. Sony A7rII with Rokinon 14mm f/2.8, ISO 3200, 30s.

Shooting west from south of Akureyri. March 2, 2016. Sony A7rII with Rokinon 14mm f/2.8, ISO 3200, 30s.

However, we very quickly elected to hop back in our vehicle, sprint north, cross the inlet east at Akuryeri on Route 1, and then head further north on Route 1. We set up just north of Akureyri (at this parking lot on a road just off of Route 1) for the best shots of the evening. The show started slowly with a spot-light like spray coming from the north/northwest:

This initial spray of Aurora reminds me of the fiberoptic strand lamps that pulsate with various neon colors. A7rII with Rokinon 14mm f/2.8, ISO 3200, 30s.

This initial spray of Aurora reminds me of the fiberoptic strand lamps that pulsate with various neon colors. A7rII with Rokinon 14mm f/2.8, ISO 3200, 30s.

A7rII with Rokinon 14mm f/2.8, ISO 6400, 15s.

A7rII with Rokinon 14mm f/2.8, ISO 6400, 15s.

Soon thereafter, the Aurora burst into such full bloom all across the sky from the NW to the NE, it lit up the foreground and even my widest angle lenses could not hope to capture it all. I tried to do panoramas, but even squeezing the exposure down to 8s, the Aurora was changing too quickly to do panos. So I finally pointed my camera at the most intense part of the show, came up with a reasonably good composition, and set my intervalometer to take photos every 8 seconds. I then sat back and enjoyed the show!

I have already made that hour-long sequence into a beautiful time lapse video which I'm planning to integrate with the rest of my Iceland video and then share with y'all before too long. Here's one more shot from the sequence:

A7rII with Rokinon 14mm f/2.8, ISO 3200, 8s.

A7rII with Rokinon 14mm f/2.8, ISO 3200, 8s.

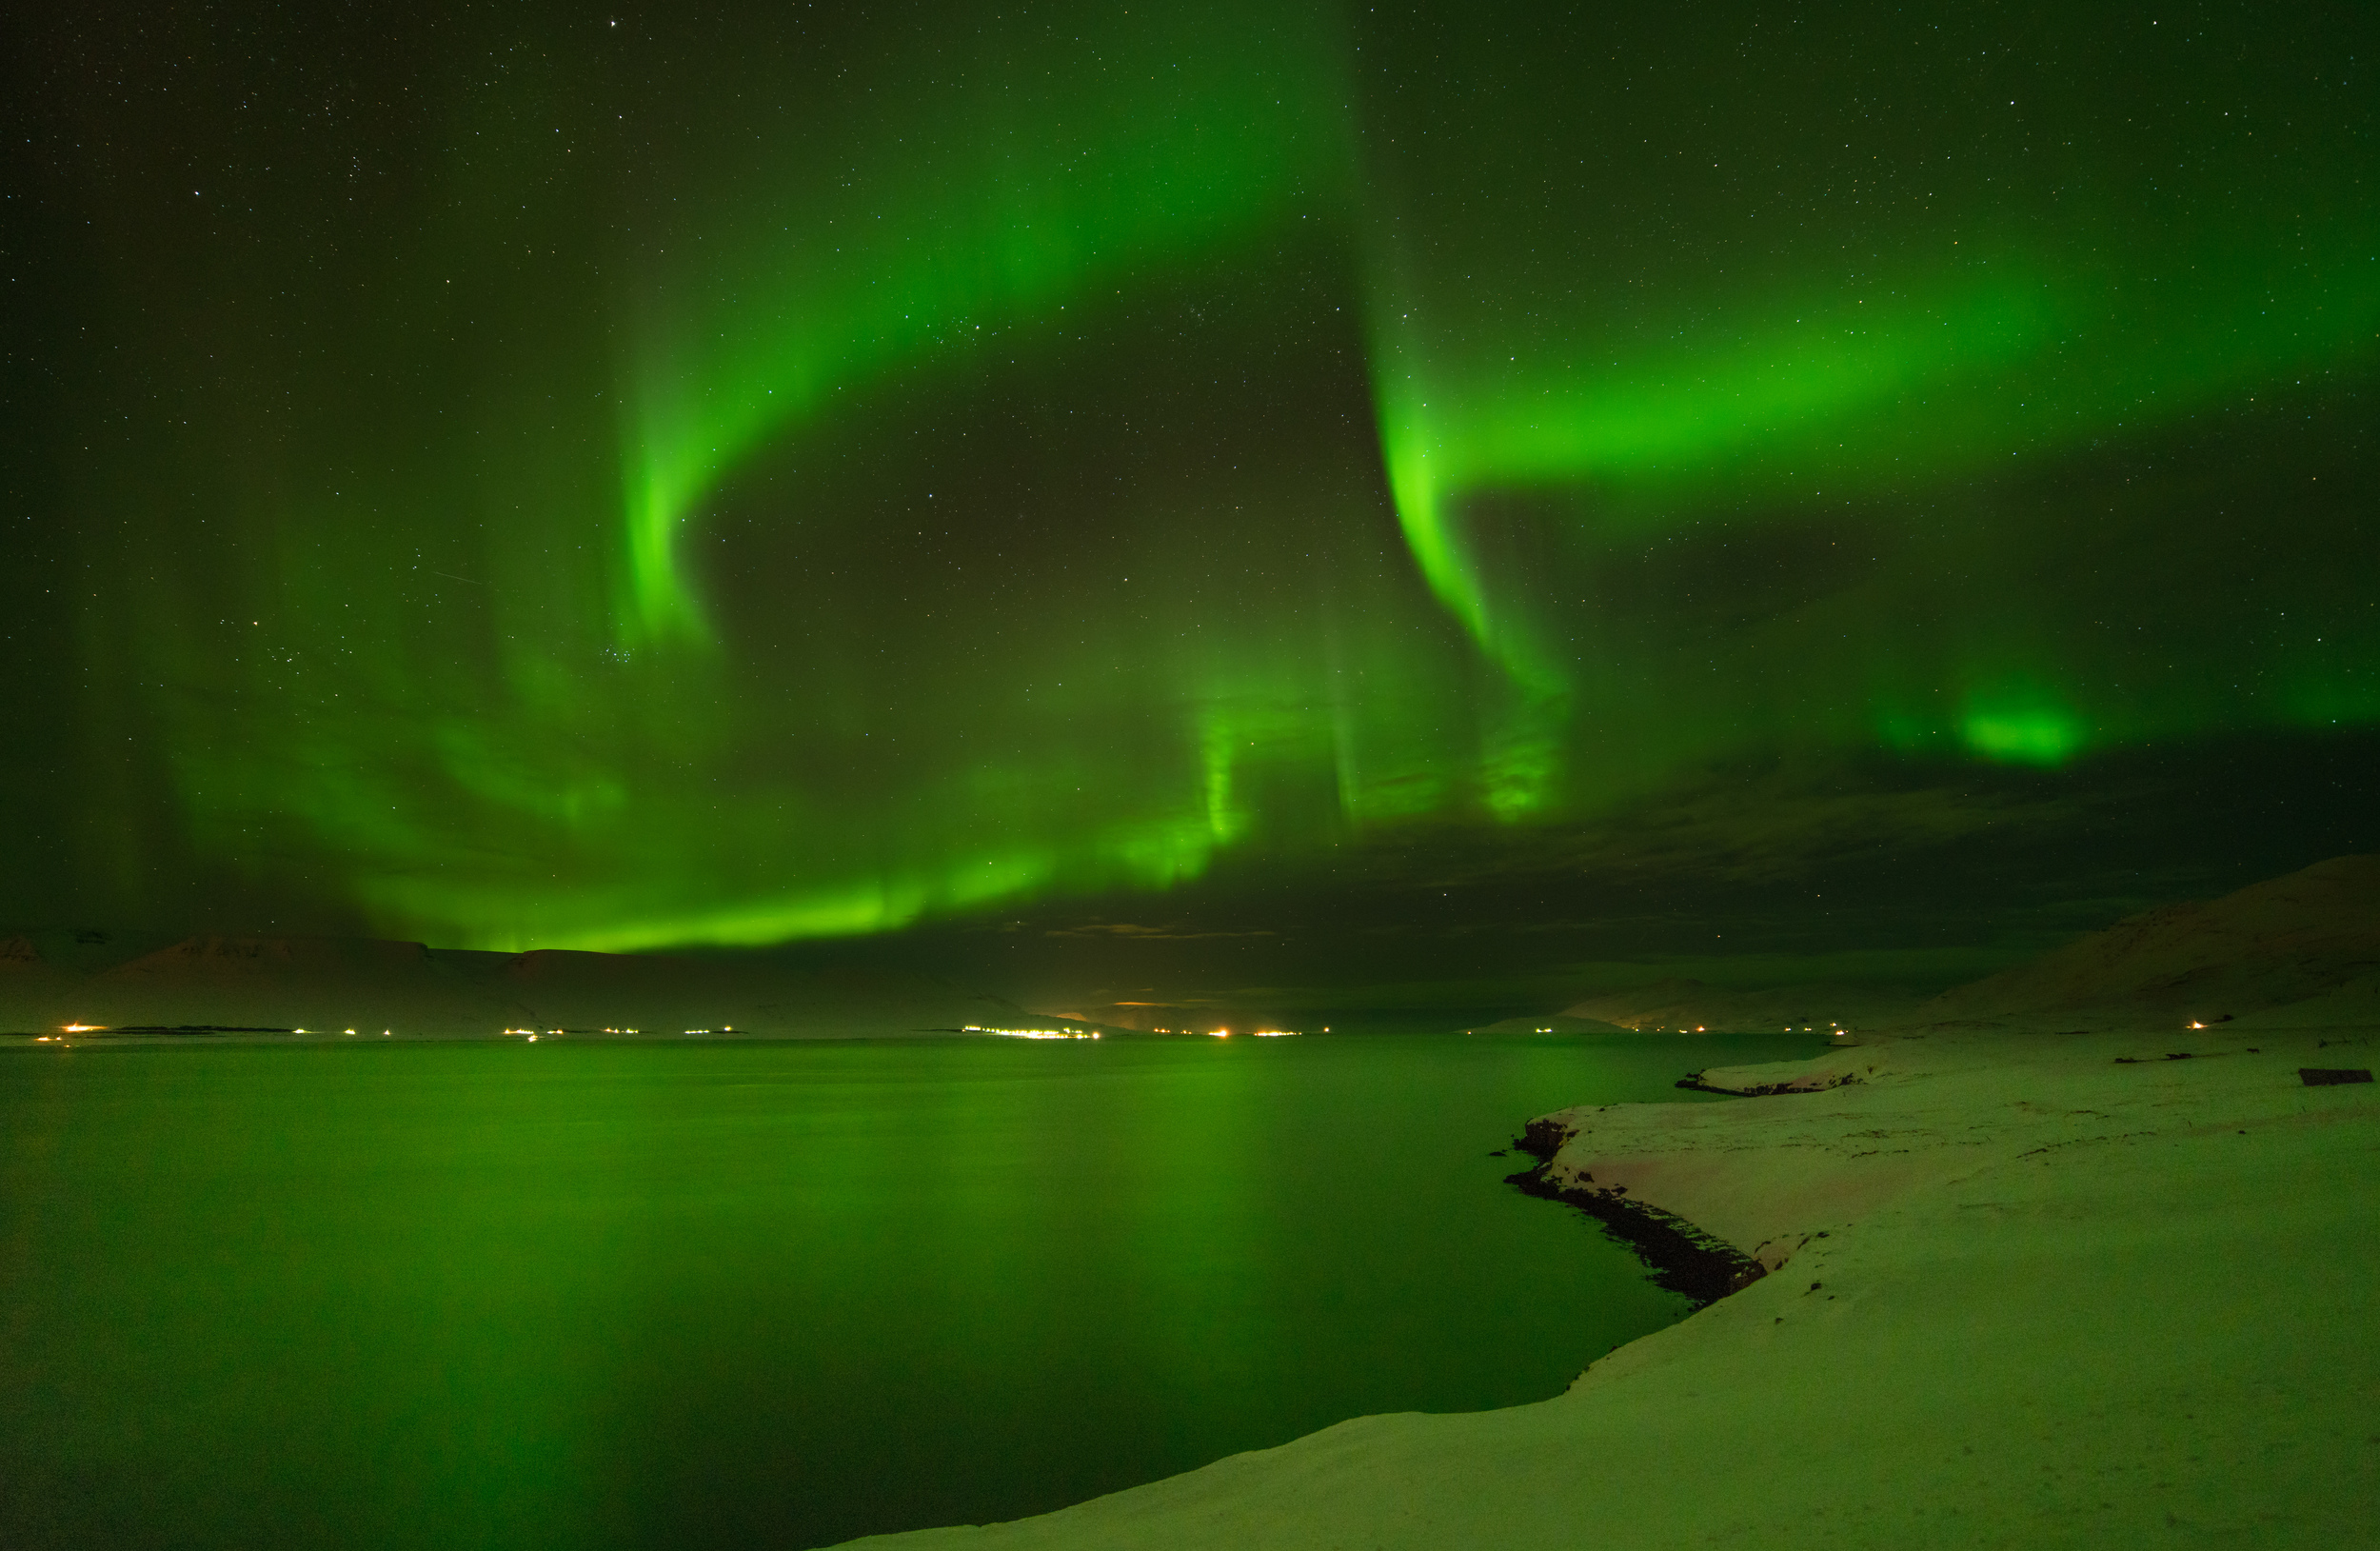
So how do I shoot Aurora Borealis?

You must use manual M mode on your camera, where you're setting aperture, ISO, and shutter speed. You can look at my settings above to get a ballpark idea on settings; don't be afraid to tweak them to match the brightness of the aurora that you're seeing, as well as ambient light from moon or light pollution. Turn off flash. You'll generally want a wide-angle and as fast (large aperture, small F-number) a lens as possible.

The thing that's hardest for most people is the need to manually focus, which is a bit of a trick in the dark. The best way to focus is to put your camera into live view mode, zooming in using the digital zoom on your screen, and then manually focusing on some distant point of light (preferably a street light or city light of some kind, but a bright star can work as well). The light will be quite bad quality because of the high ISOs your camera is using to show you it in real time, but you want to adjust your focus until the light is as small as possible. When it's big and bloated, it's out of focus. Change the focus so it starts getting smaller and smaller, and then when it starts getting bigger again, move it back to the smallest point.

Here are a few essential tools I used for these shots:

  1. Rokinon/Samyang 14mm f/2.8 manual lens (Sony FE-mount, Canon EF-mount, Nikon F-mount) - This lens is the best and cheapest lens for astrophotography of all kinds, including shooting Aurora. I know it's rare for something to be both best and cheapest, but in this case it is. It holds its own in sharpness with $2000 lenses from Canon and Nikon, it's wide-angle, it's fast with wide aperture (which allows you to lower your ISO, improving your quality; it also allows you to lower your shutter speed to reduce stars streaking), and it's fully manual. You can't use autofocus for astrophotography anyway, so it's perfect, saving money and weight. As the cherry on top, Rokinon makes this lens with mounts for all the most popular interchangeable lens systems.
  2. A cheap intervalometer - I've linked one that works with Sony, but they're available for all the brands. Don't be stuck on the one I've linked, because different "brands" come and go, but the same Chinese factories make them. Mine has lasted for a long time with heavy abuse. An intervalometer is great even if you're not making a timelapse, because the Aurora changes so quickly, you want to just keep taking photos one after the other and then go back and pick the best ones later.
  3. Sony A7rII - This camera is one of the absolute best 35mm digital cameras out there, but there are lots of cheaper options that will still do great in this situation like the A5000, A6000, A6300, or A7II. If you must, even a Canon or Nikon will get the job done.
  4. Iceland Meteorological Office Aurora and Cloud forecast - This is an absolutely essential tool that I found quite accurate. I was unable to find a tool of similar quality for Norway and would welcome any comments pointing me to any for Norway or other common Aurora viewing sites.

Here are a few important things I learned about photographing the Northern Lights:

  1. The Northern Lights are in the north in most places. Svalbard and other very far north locations are the exception, rather than the rule. A local in Svalbard told me the northern lights can appear in any direction and I had not realized that this is not universal. In most places, the northern lights will appear in the north.
  2. It doesn't have to be cold to see the Northern Lights. Luxe Adventure Traveler writes, "[A]nother common misconception people have is that it has to be cold to see [the northern lights]. The Northern Lights are actually active all year round. But because they are only typically visible in the aurora zone between 65° and 72° North, they are not visible from April through August when the aurora zone experiences nearly 24 hours of daylight. People just tend to associate Northern Lights with the cold since they are visible in the winter months, but we have seen them in August in very comfortable temperatures."

Luxe Adventure Traveler wrote two great blog posts about the Aurora Borealis entitled 5 Things No One Ever Tells You About the Northern Lights and 5 More Things No One Ever Tells You About the Northern Lights. Both are fantastic and should be read before planning to photograph the northern lights. You'll learn the best time of year to go, what causes the different colors of the northern lights, and some very sound advice on planning a trip and setting expectations.

July 31, 2016 /Hans Mast
iceland, a7rII, sony, akureyri, arctic, aurora, northern lights, winter, water, stars, astrophotography, mountains, iceland 2016
15 Comments